Tutorial on Updating Caves
Selecting Caves and Fields to Update
If you are logged in as an updater then there will be an “Update” link at the top of the page. Clicking this will bring you to the “Update Home Page”, the starting point for updating caves, maps, organisations and people.
We will login as updater jdoe and update three caves at Bungonia in NSW; B1 (Putrid Pit), B2 and B3.
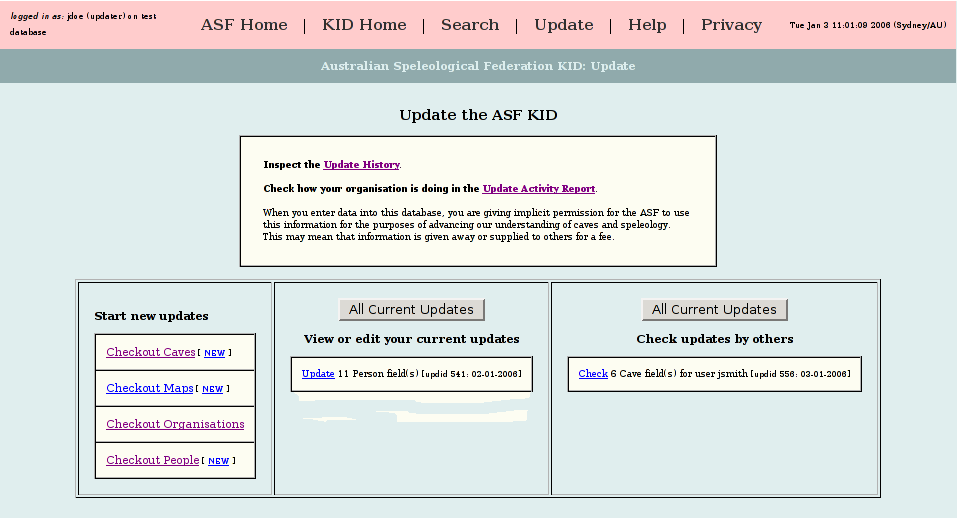
In the example above the updater is now John Doe (username jdoe) and he has a current Person update checked out. He can also see updates by others; the updater “jsmith” has a Cave update checked out. Updater jdoe will checkout and update three caves at Bungonia.
Click on Checkout Caves: A screen similar to that below will appear.
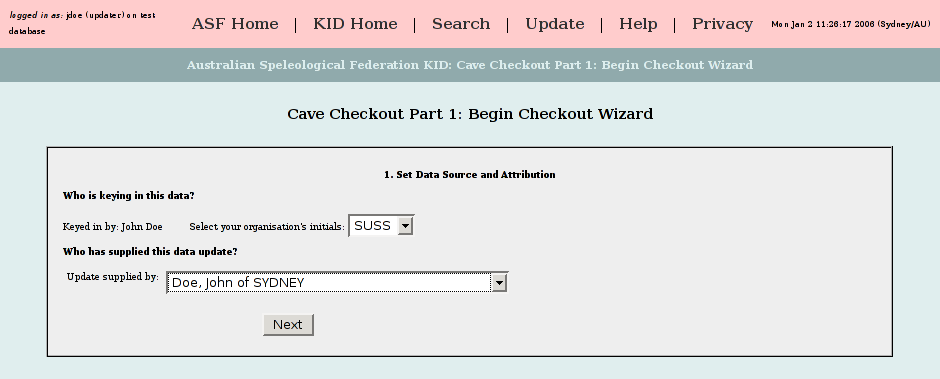
Your name, as the person keying in the data, will already have been set. If you belong to more then one organisation you will be able to select that from the drop down list box. Your name is recorded so that if there is a suspected mistake in the data someone can find out who keyed in the data.
Next you need to enter who has supplied you with the information that you are entering. It may be yourself or someone else. Usually it would be the person that filled out the Cave Summary Form. The list of persons comes from the KID – so the information supplier will need to be listed in the KID. If they are not there you will need to add them to the persons in the KID (see the Updating People Tutorial).
Click on [Next]
Note: Do not use the browser’s Back button to return to previous screens when updating the KID! As you proceed through the screens the browser sends back information about your selections and data entered to the KID. If you use the Back button then the syncronisation of data between your browser and the KID will be lost and data update errors can occur.
Part 2 of the checkout screen will now show the data that you keyed in before will be shown and a few new questions will be asked to complete the data source and attribution information.
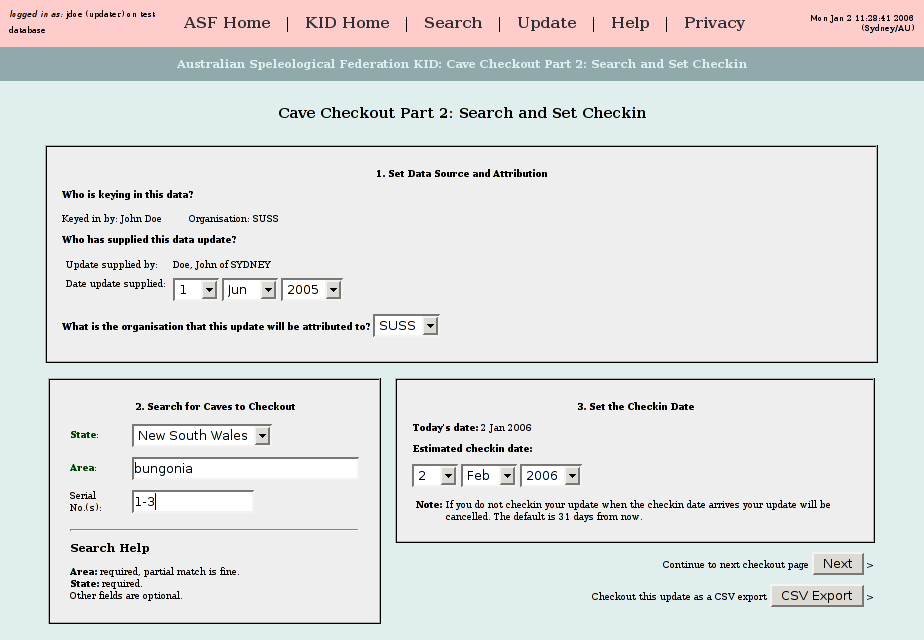
In “1. Set Data Source and Attribution” enter the date that the update was supplied. If the data is from a cave summary form it should be written on this form.
In “2. Search for Caves to Checkout” enter the State, the area name and the serial number(s) of the caves that you wish to edit.
In “3. Set the Checkin Date” the “Estimated checkin date” will show a default date 31 days from todays date. You may set a date earlier or later than this date, however the date must be later than todays date.
Note: If your update is not checked by someone else before the checkin date arrives your update will be automatically cancelled. If this isn’t done caves could be checked out for updating, never checked, and thus effectively preventing anyone else being able to update those caves.
Click on [Next]. Remember, do not use the browser’s Back button to return to previous screens.
All of the caves that you selected above will be displayed in a drop down list. If you don’t touch this list all of the listed caves will be selected for updating. Therefore in most cases you don’t need to change anything here. However you may click on a cave and then that single cave only will be selected. Additional caves can be added to the list of selected caves by using Control-click. (Control-clicking again will remove caves.)
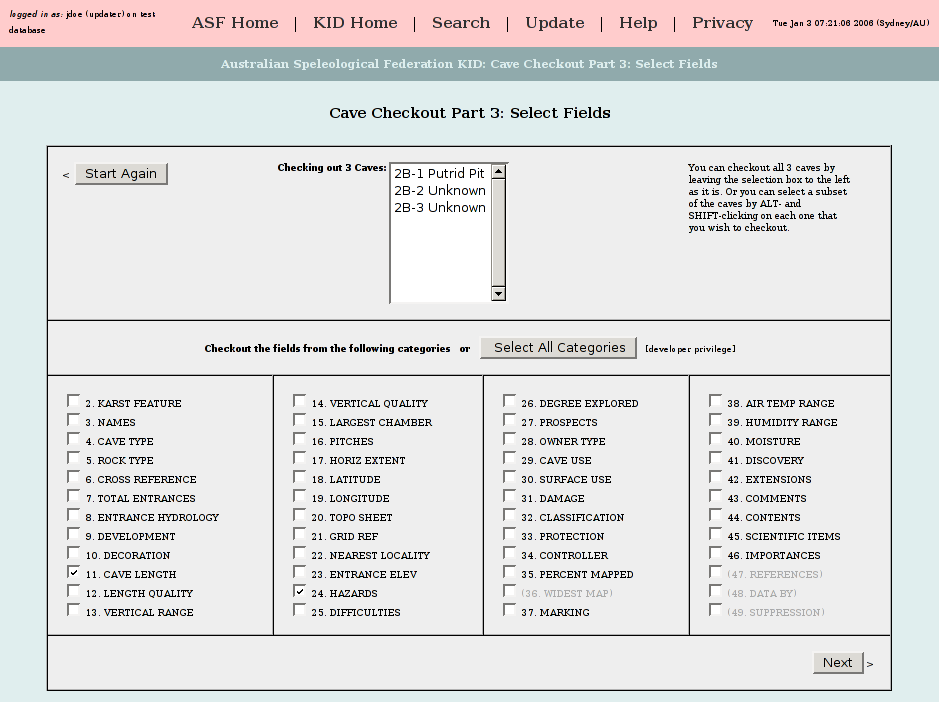
The text “Checkout the fields from the following categories:” requires some explanation. In the ASF KID the hundreds of cave related database fields available (the fields defined by the UIS) are grouped into categories. For instance the ASF category “3. names” actually contains two UIS fields; Principal Name (UIS field No. 70) and Other Names (UIS field No. 69).
Another example is ASF category “8. entrance hydrology”. This consists of:
2 Submersion
3 Flow presence
4 Flow direction
5 Internal flow
6 Internal water
10 Entrance type
20 Penetrability
Thus don’t get confused between the ASF category number and the UIS field number. Remember that you can read the definition and attributes of a UIS field by going to https://kid.caves.org.au/kid/doc/ and look at the ASF Field Definitions and the ASF Field Value Codes.
Select the ASF categories that you wish to edit. In this guide we have selected 11.1 length and 24.1 hazards.
Note: In this screen there is a [Start Again] button that can be used to return to the start. Do not use the browser’s Back button to return to previous screens.
Click on [Next]
At this stage we are presented with the list of caves and UIS fields that will be checked out for editing.
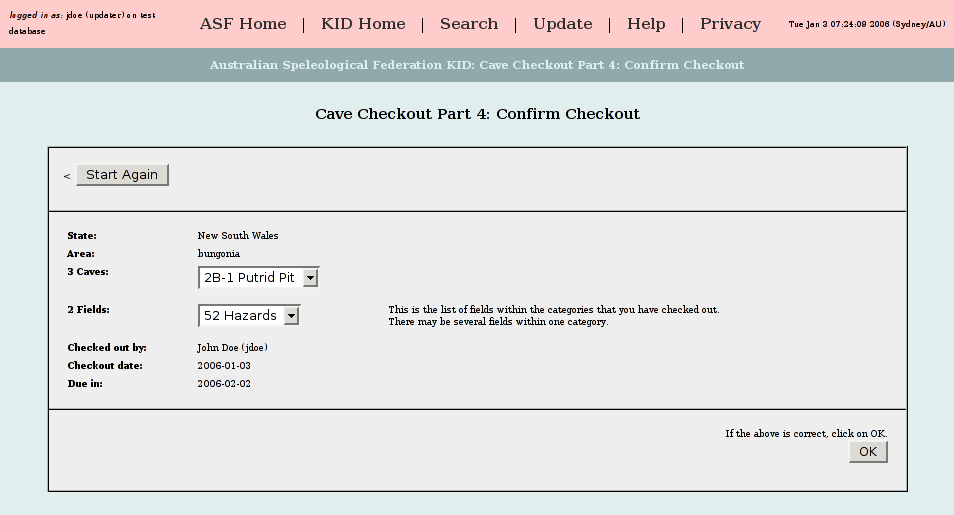
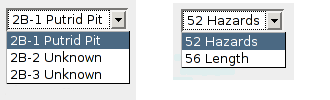
The picture below shows the drop down selection boxes. The fields that are visible correspond with what we selected to update in the “Cave Checkout Part 3: Select Fields” step.
If the caves and fields are correct, click on [OK].
The data entry screen will be displayed.
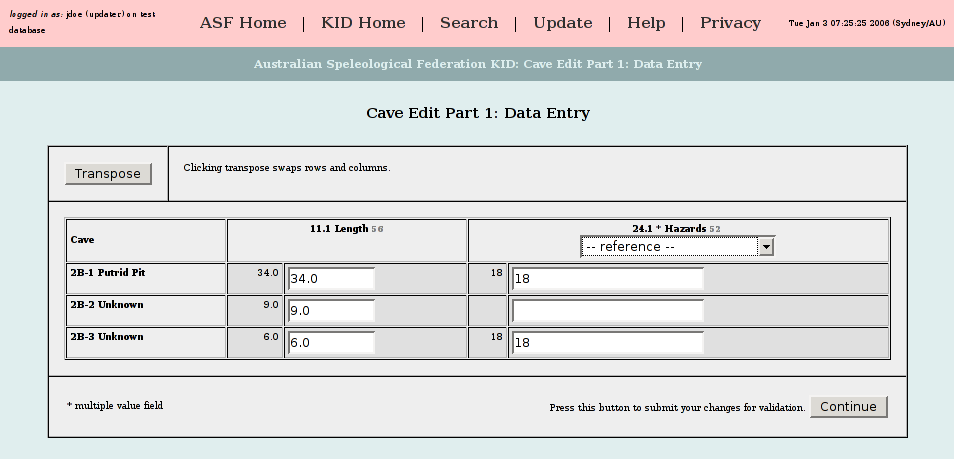
The data entry screen will start off with caves arranged across and the fields down the page. Clicking [Transpose] swaps the rows and columns. This is very useful as sometimes you will have a few caves to edit and many fields so the default layout will be fine. If you have the inverse, many caves and fewer fields, you will probably wish to swap the rows and columns.
Note: At this stage you can click on [Transpose] as much as you like but once you start entering data do not use [Transpose]! This is because when you click on [Transpose] any changes made to the data values are lost and the data reverts to the current database values, so only click on this button at the very start of an editing session.
Editing Data
In the screen below we have entered some new data.
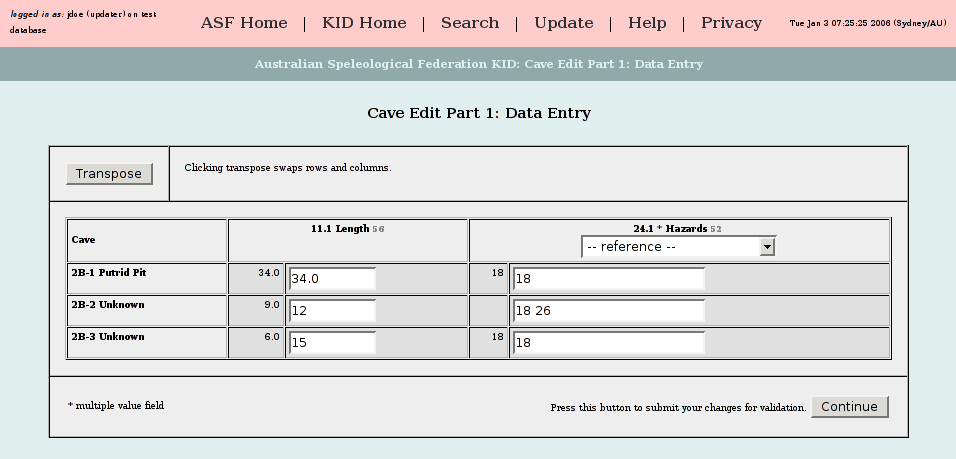

We have changed the length of one of the caves from 9.0 metres long to 12.0 metres long and the hazards description from no description to 18 26. These numbers are the international numeric codes that describe the cave hazards field. The new description of hazards is now: “foul air, ticks”. For another cave we have changed the length from 6.0 to 15.0 metres.
General note on fields: You will notice that some edit fields have a text or number entry box, some edit fields have drop down lists, whilst others have a drop down “reference” list together with a text entry box.
Fields that require a number or text will be text edit boxes. For instance “3. names” or “7. total entrances”.
Fields that require you to select one only of several options such as “4. cave type”, will have a drop down box in each field so you don’t have to enter the number codes.
Fields where you can enter one or more values such as “5. rock type” require you to enter the numeric codes manually and will provide you with a drop down list of the codes for reference. For instance if a cave is in limestone and dolomite one can enter 02 06 in the data entry box for rock type.
Note: You have to enter 02 06 not 2, 6 or 2 6 or anything else. All the field codes are listed in the documentation section https://kid.caves.org.au/kid/doc/.
Once you have made all the editing changes that you require you can submit your changes for validation.
Click the [Continue] button.
This will check that you have entered numeric values where numeric values only are accepted, and that the codes entered for various fields exist. For instance if you enter 07 for rock type (a code that does not exist) the KID will inform you that “Some of your input data was incorrect.”
If your data is valid you will be presented with the final showing the acceptance of your data update.
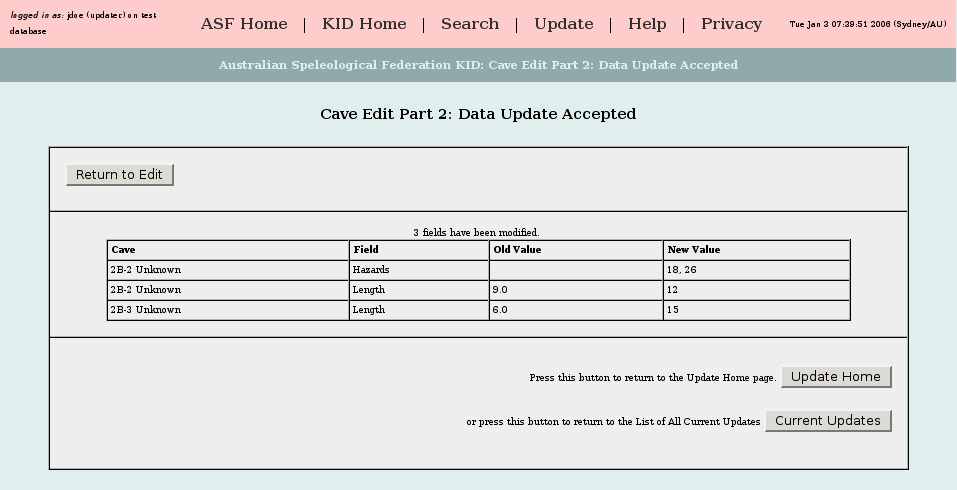
Clicking the [Update Home] button will take you to your Update Home Page which will now show your update.
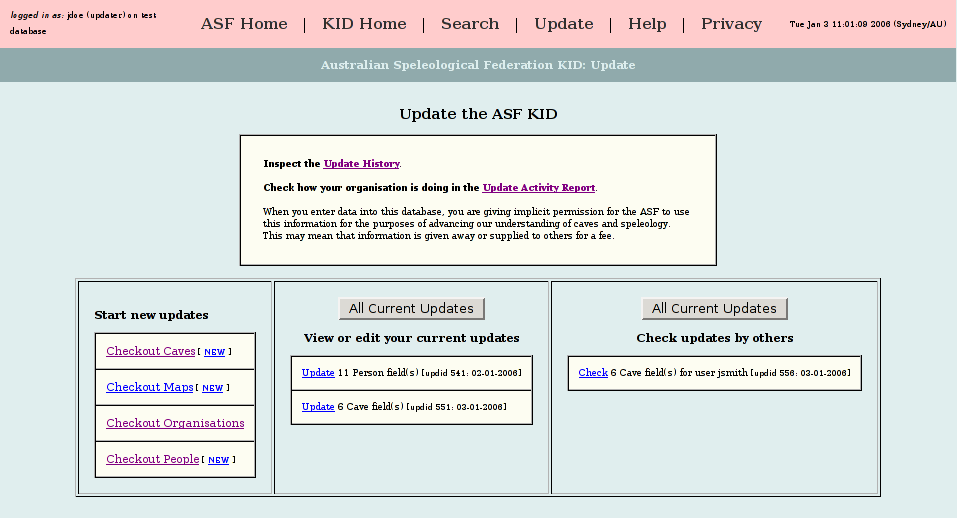
Each update has an update link. You can re-edit any of your updates at any time by clicking on its Update link.
The Current Updates Page
The Current Updates Page may be viewed at any time by clicking the [All Current Updates] button on the Updaters Home page. This page will show your updates and any other updates that you have access to see.
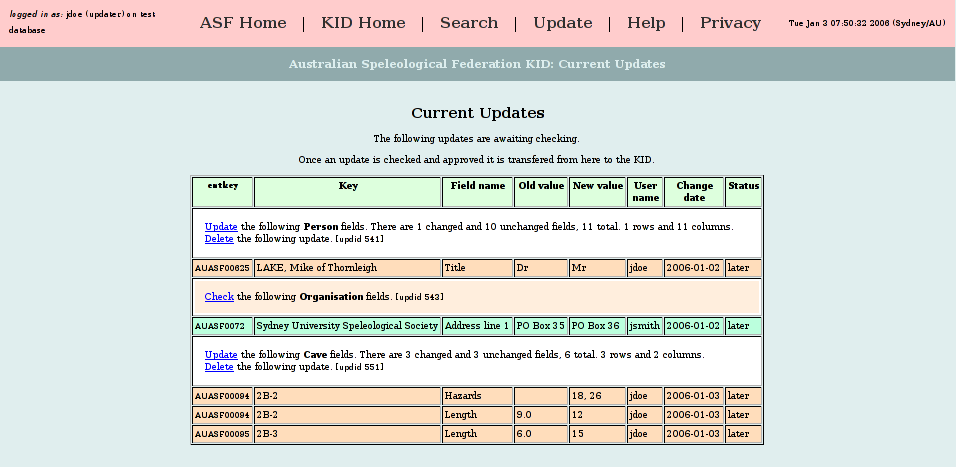
If they are updates initiated by you then you will be able to re-edit your updates via the Update links or delete your updates via the Delete links.
If they are updates by other updaters in your area then you can check only check them via the Check links. This is covered in detail in the next section.