CSV Export and Import of Data
CSV Export-only
Data can be exported from the KID as CSV (comma separated values) data. The data is actually quoted comma separated values.
The export option of CSV data can be found on the second page of the advanced search as shown in the figure below. This option will be presented for updaters only. Guest users do not have this option.

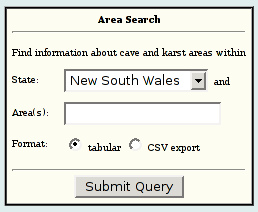
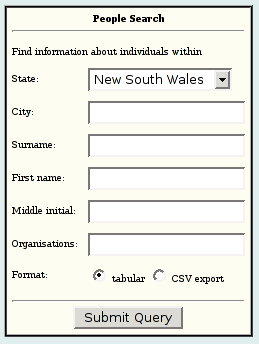
For other entities such as Maps, Areas, Articles, Organisations and People the export option is on their respective search pages such as in the two examples below.
Note that no subsequent import of this data is allowed. If you wish to edit the data and re-import the data again you need to read the next section.
CSV Export, Edit and Import of Existing Caves
This allows you to export caves as a CSV file, edit the data offline, and then import this modified data.
This procedure is started from the Update / Checkout Caves. From this page, under “Start new updates” click the link “Checkout Caves”. Checkout the caves in the normal way, providing data source and attribution information, and setting a checkin date. However instead of pressing the [Next] button to edit caves via the Web interface press the [CSV Export] button.
1. Exporting the Data
Cave Checkout Part 1: Begin Checkout Wizard
Cave Checkout Part 2: Search and Set Checkin
   1. Set Data Source and Attribution
   2. Search for Caves to Checkout
   3. Set the Checkin Date

   Continue to next checkout page [Next]
   Checkout this update as a CSV export [CSV Export] &lArrow; select this

Cave CSV Export Part 3: Select Fields
Cave CSV Export Part 4: Confirm Checkout
Note that the screen will contain some text that says:
The CSV Export will contain the Update ID (__updid) in column 1.
Do not edit __updid or any other column whose name starts with underscores.

Once the download is complete, edit the CSV data locally.
When the data is ready, visit the update home page to import the changes.
If the selected caves and fields are correct, click on the button [CSV Export]. A dialog box will popup asking for a file name for the exported data. The default file name will be something like this: Update470-Caves-20051204-3R-9C.csv
The screen will remain the same after you save the file. Return to the Update Home Page. From that page you will see that the list of your updates under “View or edit your current updates” will now show an “Import” Link.
2. Editing the Data
The CSV data can be edited with a text editor or a spreadsheet application (but see the note on spreadsheets). An example for a cave export of a few fields for three caves is shown below:
Update470-Caves-20051204-3R-9C.csv

"__updid","__cave_id","__state_in_cave_number","__area_in_cave_number","__serial_in_cave_number","__principal_name","other_names","quantity_of_entrances","length"
"470","AUASF00870","2","J","201","Wiburd's Lake Cave","","",""
"470","AUASF00871","2","J","202","","","","3.0"
"470","AUASF00872","2","J","203","","","",""
CSV Attributes
The first record in a CSV export contains the ASF KID field names as column headers. Some of these fields are so-called READONLY. For instance the fields updid, cave_id, state_in_cave_number, area_in_cave_number, and serial_in_cave_number are READONLY. The fields principal_name, other_names are not i.e. they can be modified. The reason why those fields are read-only is because they efffectively identify the cave, if any one of those fields were changed the cave would be a different cave and complete confusion would result.
The read-only fields are guaranteed to be included in any CSV exported data and precede all other attribute names in the ordering of the columns.
The difference in the attribute names between Readonly Export and Update Export data is twofold:
-
The column called
__updidis the first attribute in the export; it contains the update ID value for this update as stored in the database. -
The READONLY columns are included as the next set of attributes, but in this case, each attribute name is prepended with a double underscore (
__) to tell the offline updater that the column is readonly and must not be changed. -
The remaining updatable attributes follow on subsequent lines.
3. Importing the Edited Data
If you click on the Import link you will get the “Update Import of Caves” page for that particular import. An example of the screen that will be shown is below:
Update Import of Caves

The form below provides an interface to import a CSV file containing
Cave update data for update id 470. The update consists of 3 rows and
updateable 3 columns.
CSV File: [      ] BROWSE
[ ] Validate import but do not commit it
[ ] Show the import data
If the previously exported file is selected and you only select the “Validate import but do not commit it” checkbox then press [Import] the data will be imported and checked for correctness but it will not be committed to the database. If it passes no errors will be shown and the text “The import validation was successful.” will be displayed together with the number of fields that were changed. (No data will be displayed)
If the previously exported file is selected and you only select the “Show the import data” checkbox then press [Import] the data will be imported and checked for correctness. If it passes no errors will be shown and the text “The update import was successful.” will be displayed together with the number of fields that were changed. Each row of the data will also be displayed. You usually would not select this if you had a large amount of data.
If the previously exported file is selected and no checkboxes are selected then it will be imported and if there are no errors it will be committed to the database. It will appear for other upaters in your area to be checked just like any other cave update. A sucessfull import will display text similar to this:
The update import was successful. 5 fields were changed.
This update is ready for checking.
It will also be available for you to re-edit if you need to. On your Update Home Page the previous “Import” link will now be a “Re-import” link. Example: Re-import 9 Cave field(s) [updid 470: 04-12-2005]
If the checker accepts all the changes made by this update then this “Re-import” link will disappear as the update will have been accepted. The exported CSV file will still be on your computer. This can be deleted.
Using the Re-import link:
If the checker only accepts some fields but not others (i.e. they used the [Use Selections Below] button rather than the [Accept All] button.) then you will see “Re-import 7 Cave field(s) [updid 471: 04-12-2005]”. If you go to the “All Current Updates” page you can see what the checker has accepted, rejected or left to later for your update. Edit your data again and use the “Re-import” link.
CSV Import of New Caves
This allows you to do a bulk import of new caves into the database from a CSV datafile. This should not be used for just a few caves. Use the normal KID Create New Cave functionality to create one or a few new caves. The bulk import descibed in this section should only be used if you have hundreds of new caves.
Like creating new caves in the Create New Cave section importing caves by this method will result in these new caves being immediately visible in the KID to users.
Bulk import is done via the Update / Checkout Caves. From this page, under “Start new updates” click the link [NEW] (to the right of the link Checkout Caves).
You will get the “Create New Cave: Data Entry and Import” page. There are two options on this page: “New Cave” or “Import Caves”.
-
The New Cave option allows you to create new caves one-by-one. You just have to specify an “Area in cave number” and optionally a principal name then click the button [Create].
-
The Import Caves option allows you to import a set of new caves, the details of which have been created externally. The details of this will be covered here. [Import]
Click the [Import] button. You will get the “Import a New Set of Caves” page.
You must have a file of the new caves already setup in the correct format. An small example is shown below. Note that you should not be importing such small data sets. The import facility is designed for the few times when you need to import data from another cave database and there are hundreds of entries.
"cave_id","state_in_cave_number","area_in_cave_number", "serial_in_cave_number","principal_name","quantity_of_entrances","length"
"AUSUS00869","2","J","1020","Mikes Cave","1","10.0"
"AUSUS00870","2","J","1021","Jills Cave","1","50.0"
"AUSUS00871","2","J","1022","","1","100.0"
and
"The import validation was successful. 3 new caves would be created.
Since this is only a validation check, the new data were not committed."
and
Your import will be checked for accuracy by another updater. [Edit Import]

The import was successful. 3 new caves were created.
The import of new data is ready for checking as update number 456.
Cave AUSUS00869 successfully imported
Cave AUSUS00870 successfully imported
Cave AUSUS00871 successfully imported.
It will then appear as a new update for the checkers to check.
Note: You can’t import this data set again as now those cave numbers exist in the KID.
The conditions for acceptance of new data imported in CSV format are as follows:
- The column named cave_id is required: it is the primary key for the new data.
- The column state_in_cave_number must be present.
- The column area_in_cave_number must be present.
- The column serial_in_cave_number must be present.
- All other updatable cave FIDs can optionally be included in the create data except the many-multiple parallel data.
- Each primary key must not already exist in the database. The primary key must be of the form AUORGnnnnn where AU is literally present,the three letter ORG are replaced by the organisation code of the org entering and maintaining this new cave data. nnnnn is a unique number to ensure the primary key is unique e.g. AUSUS00891. Note that “ASF” is not an allowed org code.
- The org code must be in the updater’s organistions list.
- Each primary key in each row of create data must have the same ORG code.
- The combination of each (state, area, serial) must be unique across the entire import and must not already exist in the database.
- Each state_in_cave_number must exist as a state_code.
- Each area_in_cave_number must exist as an area_code.
- Each value in each column must be valid for that FID; this is the data validation phase of the import.
If all of the above conditions are met, the new data is accepted and the relevant cave tables are updated from the CSV data.
Problems Importing Data into Spreadsheets
When importing data into spreadsheets one must be very careful as the application might convert strings such as “02” to numbers like 2. This is a error in the spreadsheet application. If this occurs the data will not be able to be imported into the KID as it will flag the fields with the wrong type as errors. Below is an example of data where this problem can occur.
This is the original data as exported from the KID. You will see that the rock type is code “02” which stands for limestone and decoration code is “02 10” for “extensive excellent”.
"__updid","__cave_id","__state_in_cave_number","__area_in_cave_number","__serial_in_cave_number","__principal_name","other_names","rock_type","decoration","length"
"530","AUASF00671","2","J","1","Elder Cave","Elder Cave Doline","02","02 10","474.0"
"530","AUASF00672","2","J","2","Chifley Cave","Left Imperial Cave","","02 10","1000.0"
"530","AUASF00673","2","J","3","Jubilee Cave","","","",""
This is the data after importing into a spreadsheet. I have edited the headings to be shorter.
| updid | cave_id | state | area | serial | name | other_names | rock_type | decoration | length |
|---|---|---|---|---|---|---|---|---|---|
| 530 | AUASF00671 | 2 | J | 1 | Elder Cave | Elder Cave Doline | 2 | 02 10 | 474.0 |
| 530 | AUASF00672 | 2 | J | 2 | Chifley Cave | Left Imperial Cave | 02 10 | 1000.0 | |
| 530 | AUASF00673 | 2 | J | 3 | Jubilee Cave |
The spreadsheet guessed (incorrectly) that “02” was 2. It left “02 10” as-is because there was a space between the characters. This is not always the case though. In the field “cave development” the codes consist of three characters and in this case strings such as “002 004 006” (active and bifurcating) are interpreted as European style thousands separated by spaces and converted to the number 2,004,006.